Every app and website needs to undergo a test activity to ensure it functions properly before being officially launched to users. However, a test activity should not be defined as a random checking action. Instead, it requires a comprehensive, structured approach and is known as the fundamental test process.
At its core, the test process is a methodical series of phases designed to evaluate a software product against its requirements, identify defects, and build confidence in its quality. This article will guide you through the stages of the test process and offer you a basic foundation of what testers will do during each stage.
1. Test Planning and Control
Test Planning
A test process starts with two key questions: what should be tested and how to achieve these results. Does it really matter that much? Imagine a case when you are tasked with a project but do not know what we need to obtain and how to do it. Without clear goals or direction, many failed attempts waste significant time and effort trying to reach the objective.
As a result, test plans are mostly required in a basic test process. Not only does it draw a roadmap corresponding with the project timeline, but it also highlights the key milestones to be accomplished.
What actually do we do in the planning steps? In this stage, we will define the testing scope, clarify testing objectives, and identify completion criteria.
Testing scope:
Testing scope refers to “what” to be tested and not. Test scope can range from a full project’s master plan to a two-week agile sprint. There are no official rules, but your team should consider factors like risks, time, and requirements to finalize the test plan. Then, you can prioritize the key areas for the current phase and keep track of other issues for later.
Discover our guide for mastering Test Plan here: Mastering Test Planning: Your Guide from Chaos to Clarity
Testing objective:
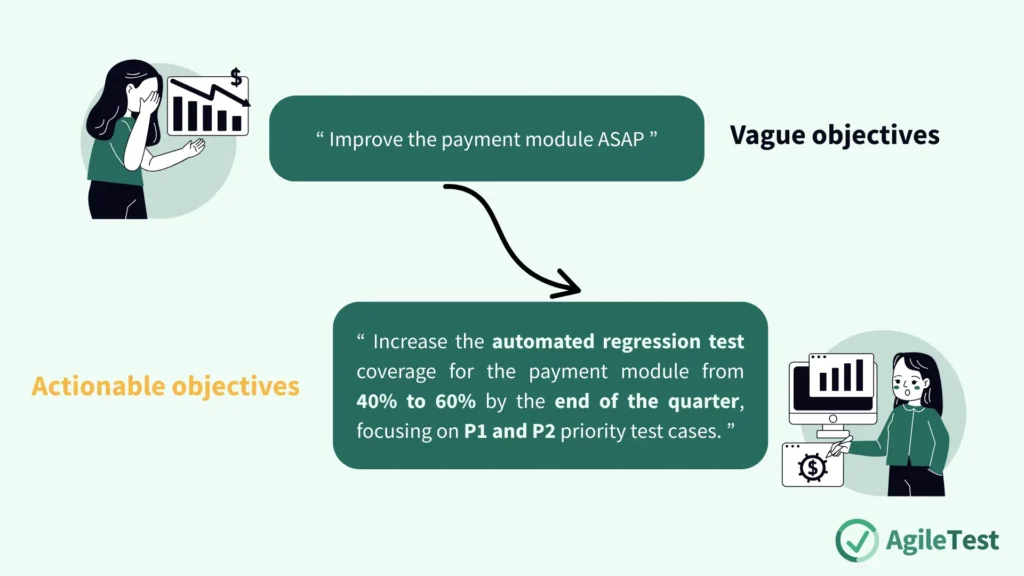
Testing objectives refer to the “what” to be achieved at the end of the testing process. These goals need to be as specific as possible to avoid misleading direction or unachievable outcomes. You can apply for the S.M.A.R.T. framework to transform vague goals, for example, “Improve the payment module ASAP” to more effective ones like this: “Increase the automated regression test coverage for the payment module from 40% to 60% by the end of the quarter, focusing on P1 and P2 priority test cases.”
Learn more about setting effective Test Objectives with our guide: Your Project’s North Star: A Practical Guide to Test Objectives
Completion criteria:
Completion criteria refer to “what” to be met to end the testing process. Setting up these standards helps you gain more confidence to close the test without the concern that some of the requirements are not fulfilled. Some common criteria will be the number of test case executions, defect metrics, test coverage, etc.
Sometimes, a detailed test objective can also be set as a completion criteria. For instance, you set the objective to achieve a 90% test coverage of the current feature within 5 test runs. Then, already have 2 concrete metrics ( 5 test runs, 90% test coverage ) to determine whether you should end the test. Although the same statement can be used for both setting an objective and an exit benchmark in this case, they have different roles. The objective is the target, while the completion criterion is the proof that you’ve hit the target.
Test Control
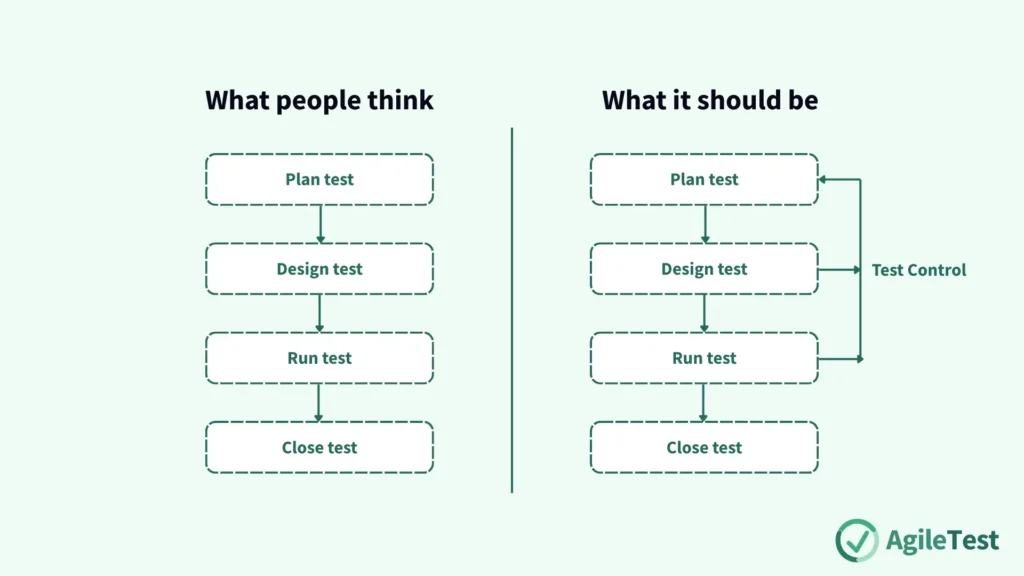
Test control is the activity of managing your current work to ensure that everything is on the right track to your plan. One critical mistake that a large number of people encounter is that they involve themselves in the testing process with a Waterfall approach. They “get it done and move on”, never looking back at the original plan. Without tracking and adjusting work to goals, results often fall far from what was initially expected. This shows the importance of test control: continuously aligning testing activities with test plans at every stage.
Gain the key differences between Waterfall vs. Agile Testing with our article: Agile Testing vs Waterfall Testing
In some cases, if plans lack preparation or risks arise, adjusting goals and plans during test control becomes essential.
2. Test Analysis and Design
Test Analysis
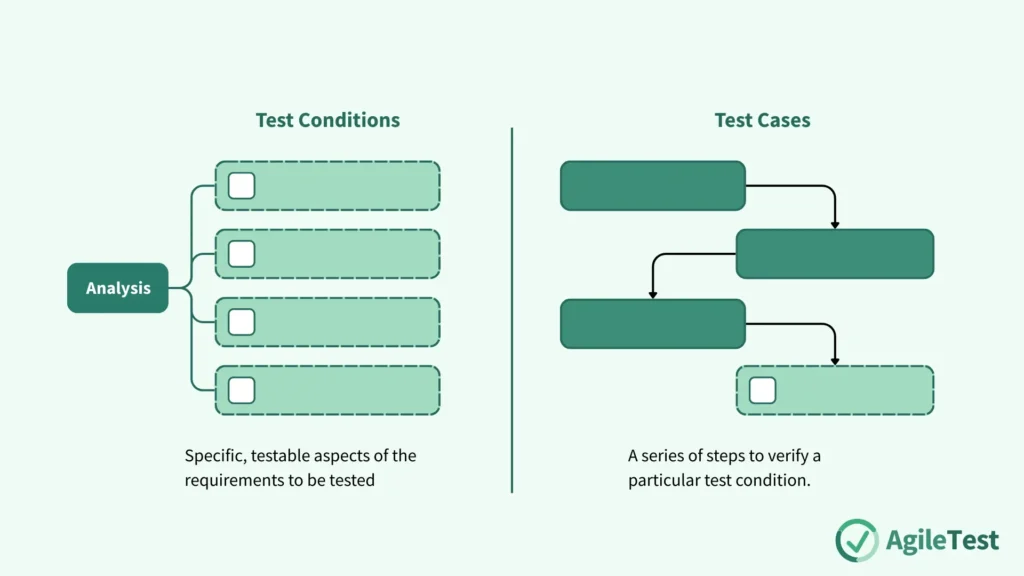
After acknowledging the test scope and objective in your plan, you come to the next stage to scrutinize the requirements and generate test cases based on your analysis. Test analysis starts with you defining which items are testable or not. Then, you can transform those testable ones into test conditions and group them into test cases to your demand.
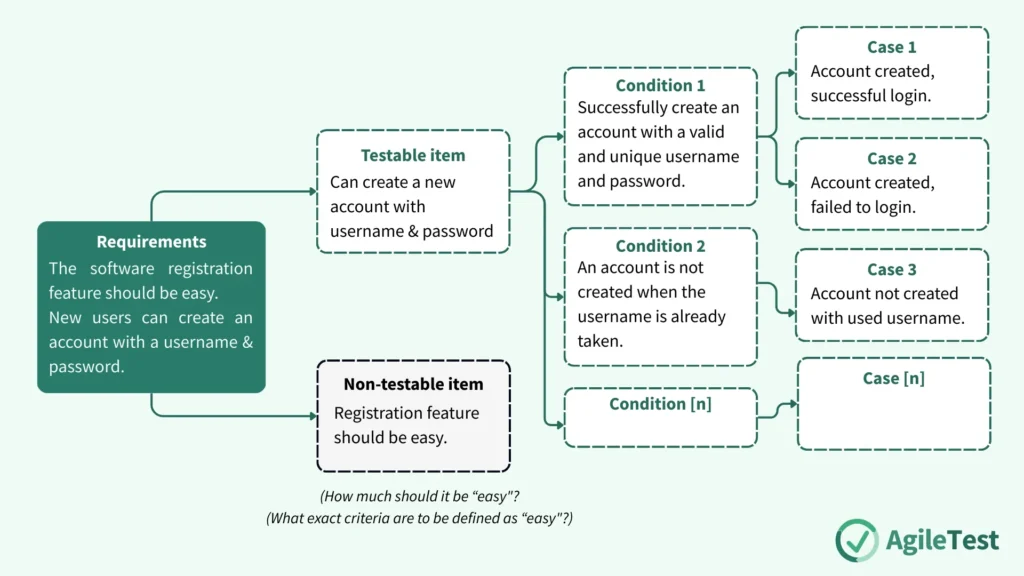
Test conditions refer to specific, testable aspects of the requirements to be tested, such as “User login successfully with username and password”. Meanwhile, test cases are a series of steps to verify that condition. A test case should contain multiple test conditions so that you can cover a large number of test conditions with a small test case execution. Interestingly, a test condition should also be equipped with more than one test case to ensure it is checked with all covered scenarios.
Within these test cases, you will know which resources are required and in what quantities (Test environment, Timeline, Human experts, etc.), allowing you to effectively monitor and manage your plan.
Test Design
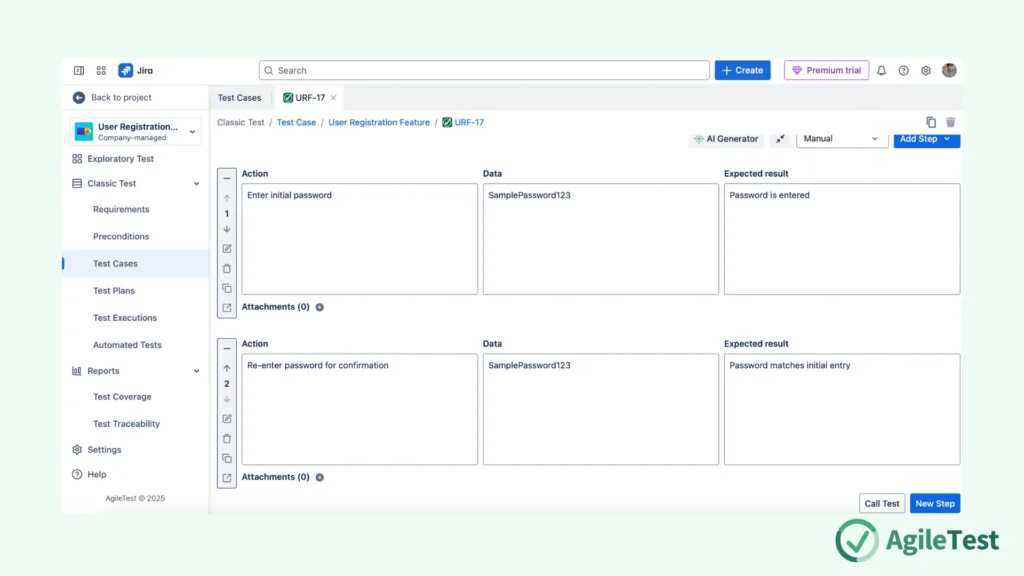
From these test cases, you move to the Test Design stage to detail the test steps in each test case before executing them. Depending on test types, the data set of test steps may differ. In general, a test step normally includes the action description, the input data, and the expected results. These steps let you easily find what caused the error, saving time on debugging. The clear “input and output” format also removes vague results and aligns with the test plan.
3. Test Implementation and Execution
Test Implementation
After having a list of test cases, you will need to finish the preparation before running them. Two main activities should be conducted in the Test Implementation stage, including setting up the environment and prioritizing testing.
Alongside the hardware and software preparation, it is recommended to prepare some smoke tests. These confidence tests, which cover critical functions to identify major defects early in the development cycle, will assist you in checking the readiness of the test environment and avoiding interruptions during test sessions due to flaws.
Imagining that you have over 1,000 test cases, which one should you test first? At this time, review your written test cases and use test plans as benchmarks to order testing. If your goal is verifying risky features, test from highest-risk to lowest-risk cases.
Test Execution
Now it’s time to run and re-run the tests you have been preparing in the Test Execution stage. You will conduct test runs and re-runs following your setup and test plan. One common retest mistake is focusing only on fixes while ignoring possible conflicts with the overall software. Make sure that you conduct both types of them for those items in the retest activities.
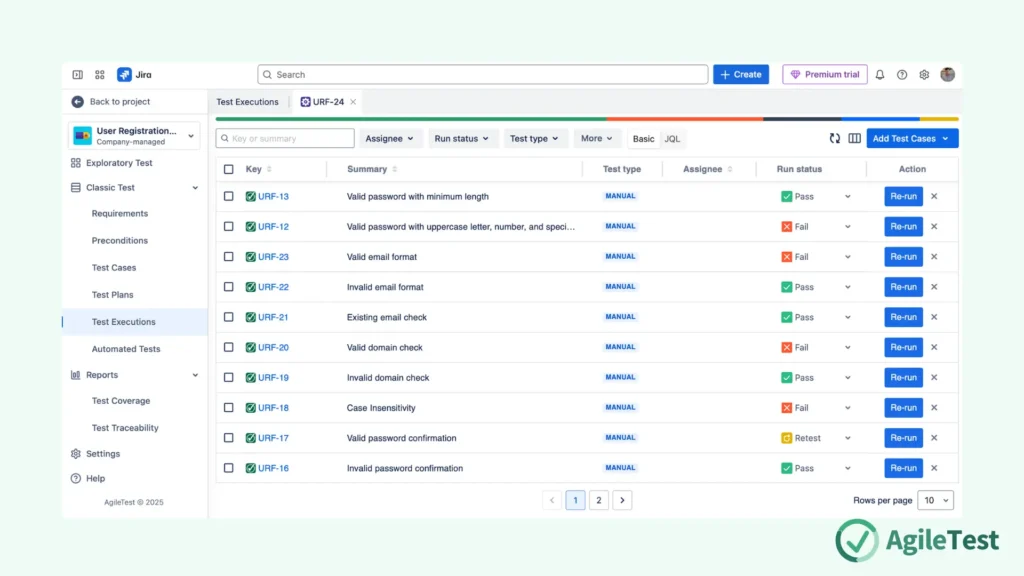
Marking test status
Whatever approach you may apply to run test cases, it is a requirement to log your test records. Each test case required a test status after each run. Some common test statuses include Pass, Fail, Blocked, and Skipped.
Ideally, when a test case has the same results as your expected ones, you assign it a Pass status. Contrastingly, you need to assign a test case with a Fail status if there are any differences between your expected data (in your test steps) and actual results. It is a common oversight that people only assign a Fail status to bugs.
With some test cases that you cannot run due to an issue outside of itself, such as the previous test step was not executed due to server errors, you may assign this case a Blocked status. In some scenarios, when you intentionally ignore running a test case (due to time limit, only focus on re-running failed cases, etc), its status should be assigned as Skipped.
Inputting test data
You do not just mark the status of each test run to make your dashboard beautiful; you need to input additional information to deep-dive into issues. Commenting is a good communication approach between your team. This helps you note down your observation that could not be explicitly demonstrated only via a test status. Even a Pass test case can also have some comments like “Functions, but too slow loading time, need more enhancements.”
With those cases in Fail or Blocked status, adding test evidence (pictures, images, etc) and providing steps on how you encountered issues would save more time for your team to reproduce and investigate them.
Other details like testing time and PIC should be included to adjust your test plan when further adjustments needed.
4. Evaluating exit criteria and Reporting
Evaluation exit criteria
Next, you will move to the stage of evaluating exit criteria, which are defined in the test plan, against the actual data in the test logs to know when test runs should end.
Comparing proposed metrics with current data shows pass case percentages, test attempts, bug rates, and severity, etc. This usually results in two circumstances: you happily close the execution stage when all criteria are met, or you need to adjust the plan to have more test attempts, change the exit criteria to meet the constraints, or both.
In either of the situations you may face, the exit criteria help avoid emotional decisions at each run and guide the right next steps. Furthermore, this information, along with the test results, will become the key input of your test report.
Reporting
Test reporting refers to the activity of generating a well-written and readable document to update the stakeholders (team, project owner, client, etc) with key data of the test process. Utilizing multiple types of charts to visualize your test data is recommended, but do not overdo it. Leave space for your analysis, or your report will be just a beautiful dashboard but will have no actionable insights.
A well-written report should contain a summary section to overview the context of the current test process. It should also have a variances section to log test data. A comprehensive assessment is needed to compare expected and actual results and explain their differences. A risk evaluation section should be included to consider risks and plan next steps. Finally, a learning section should reflect core lessons from the test process.
These insights will help you and your team improve planning, resource allocation, and approach selection in future stages.
5. Test Closure activities
During the test process, there are numerous steps when you will need to modify to match the current conditions. Little or not those changes are, they would still differ from your initial test plan. Therefore, you will undergo some wrap-up activities to double-check the completeness and consistency of all your delivered outcomes. This is when the test closure activities begin.
You may verify tasks with checklists, evaluate reports, and ensure the team learns for future projects. Also, you can have some setup duties, for example, organizing your test data and test environment for future usage, handing over test artifacts for maintenance purposes, etc.
Final thoughts
The fundamental test process is a methodical and essential framework for building high-quality software. It begins with Test Planning and Control, which defines scope and objectives to prevent wasted time and resources. This leads to Test Analysis, where vague requirements are transformed into specific test conditions and detailed test cases, ensuring comprehensive coverage. The process continues with Test Implementation and Execution, where you prepare and run tests efficiently. Then, it moves to Evaluating Exit Criteria and Reporting, which provides objective standards for completion and a clear summary for stakeholders. This process ends with Test Closures activities, where you wrap up and organize your test data.
The fundamental test process is more than a series of checks; it’s a strategic commitment to quality. This structured approach gives your team clear direction and workflow, ensuring each test phase delivers effective insights.