
Measure test progress is an important practice for tracking the effectiveness and quality of your testing efforts at every stage of your Agile development cycle. Without proper tracking, it becomes challenging to assess whether the product is ready for release.
According to research, 74% of organizations that use test metrics report improved test planning and higher-quality releases.
In this article, we will explore how measuring test progress helps teams stay aligned, reduce risks, and ensure a smooth release of a high-quality product.
1. Why Test Progress Metrics Matter in Agile Teams
Agile teams are built to move fast, delivering features in short and continuous cycles. But speed alone isn’t enough. Without clear visibility into testing progress, it becomes difficult to track the actual quality of the product.
Without clear test metrics, teams are often filled with confusion to assess their test progress. The lack of concrete data leaves teams relying on assumptions and experience. This make teams hard for teams to determine whether their testing efforts are on track or if they are ready for release.
In fact, teams may struggle to answer key questions:
- What has been tested so far?
- Are there any critical issues still open?
- Are they fully covered by important requirements?
- …
When test metrics are applied, these questions can be answered with clear, data-driven insights:
- 85% of test cases have been executed, and it’s time to focus on the remaining critical ones.
- 90% of defects with high and medium levels are resolved, indicating that no more critical bugs should be a concern.
- 70% of requirements are covered by test cases, showing that most core features are tested.
Test progress metrics now act as evidence and a benchmark for teams to follow. By considering them before taking actions, teams can remove biased assumptions and accurately evaluate their actual test progress.
2. Key Test Metrics in Standardized Test Reports
Essential metrics provide clear insights into the testing process and product quality. The three main key metrics most QA teams focus on include:
Requirement Coverage
Requirement coverage shows whether requirements are covered by test cases. It answers the question: Have we tested everything that matters? By tracking this, you can identify gaps in testing and prioritize critical features to minimize risks before release.
Even when you execute all test cases, if a critical feature like authentication isn’t covered by any tests, your team cannot confidently make the release.
In this case, the Requirement Coverage metric will highlight this gap. Your team needs to prioritize testing the authentication feature in the next sprint before moving forward with the release.
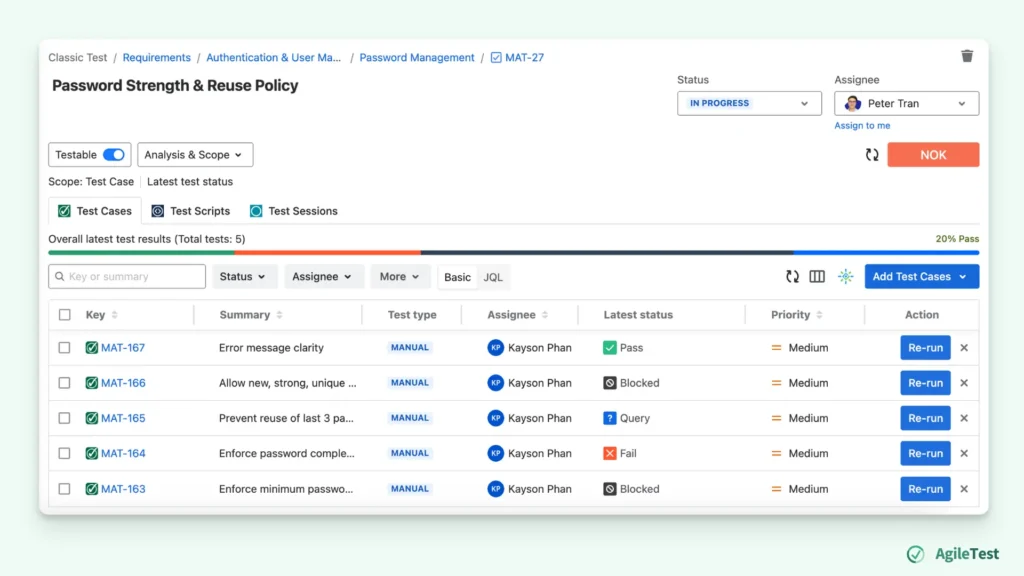
Test Case Execution
Test case execution shows your test case status after execution. It helps you answer an important question: What areas need more attention based on the execution results?
Though most test cases have passed, if a crucial test case, such as payment, consistently fails, it signals a problem. Your team cannot proceed with the release without resolving this issue.
The Test Case Execution result helps you track the execution status of test cases over time. You can notice any abnormalities and make timely adjustments.
Defect Status
Defect status tracks the severity and resolution of defects discovered during testing. It helps you find out the question: Is the product stable enough for release? By monitoring defects, you can assess the severity of issues and determine whether the product is stable enough to release.
A low defect resolution rate may indicate that you should focus on verifying new features rather than debugging existing issues.
Defect Status also helps you to prioritize issues that most affect product stability or user experience.
3. How to Measure Your Test Progress with AgileTest
Measuring test progress often feels like piecing together a puzzle. Teams may use different tools or spreadsheets, making it difficult to get a clear and up-to-date picture of testing status.
But it doesn’t have to be this way. With AgileTest, you can simplify test progress tracking. Instead of juggling multiple tools, AgileTest brings all your test data into one platform.
Let’s explore how to measure your test progress with AgileTest reports.
Step 1: Track Requirement Coverage with the Coverage Report
First, you can select the Coverage Report to gain an overview of how well your test cases align with requirements. This report is designed to ensure that you’re testing all the essential aspects and can quickly identify any gaps in coverage.
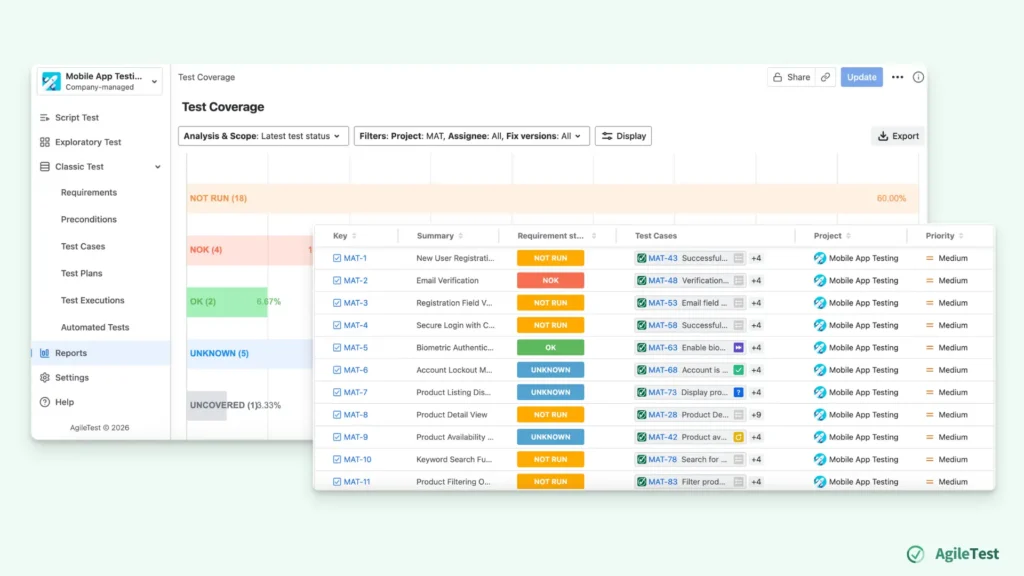
You can use this report to cross-check whether each requirement has at least one test case. If a critical feature like authentication or payment is not covered, your team can quickly add tests before release.
Besides, can also get an overview of the requirement status, which is calculated based on the status of related test cases. This gives you a direct answer regarding the status of each requirement. For instance
- OK status means that the requirement has been fully tested and all related test cases have passed.
- NOK indicates that some test cases for the requirement have failed, and they need to be rerun before proceeding.
- NOT RUN means there are some tests that have not yet been executed for this requirement.
- UNKNOWN signifies that the status of the requirement cannot be determined at the moment, possibly because some tests need to be retested or are in a query to define their status.
- UNCOVERED indicates that no test cases are linked to the requirement.
Additionally, during the sprint review, you can quickly assess whether your project requirements are ready to move forward. Instead of vague discussions, you can base your decisions on concrete data:
- Requirement ADLY-203 is covered → It’s verified by 32 test cases and has an OK status, meaning it’s fully tested and ready for the next phase.
- Requirement ADLY-204 needs more attention → It’s only linked to 2 test cases, so we should prioritize testing this requirement in the next sprint.
Step 2: Monitor Test Case Execution with the Cross Execution Report
Next, you can use the Cross Execution Report to get a comparative view of your test results across multiple executions. Here, you can select different test executions to assess their test case status.
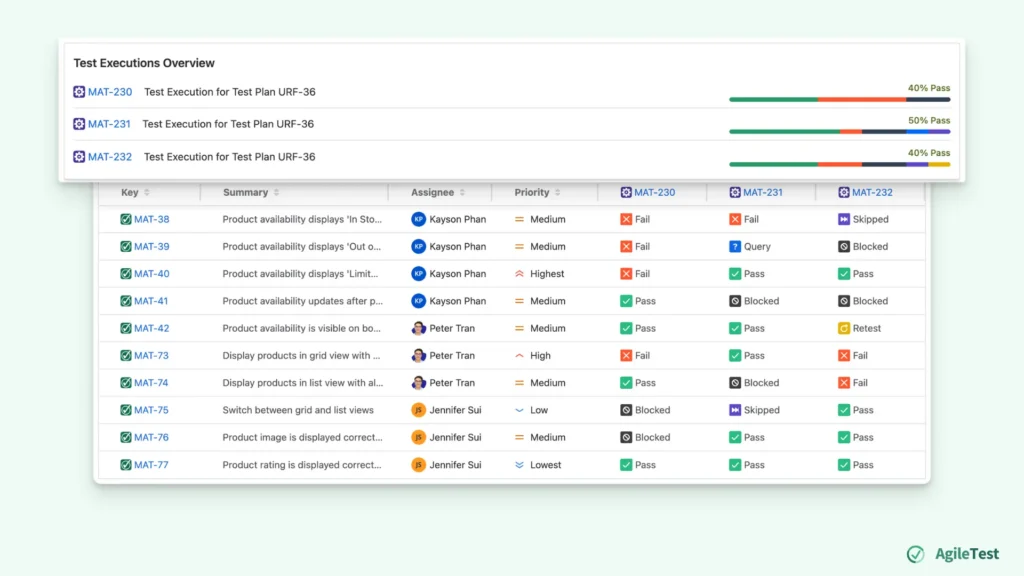
With this report, you can quickly see which tests have passed, failed, or are blocked. What sets it apart is the ability to observe test status trends across executions, rather than just single test runs.
By selecting different test executions, you can observe test status trends. If a test case continues to fail in multiple executions, it signals an ongoing issue that should have deeper analysis.
This allows teams to focus on fixing the root cause, rather than addressing isolated failures.
Step 3: Track Defect Resolution with the Defect Summary Report
As you monitor your test progress, it’s equally important to track and manage defects that arise during testing. This is where the Defect Summary Report comes in. It offers a clear and organized view of defects, helping you assess the product’s stability and resolution ratio.
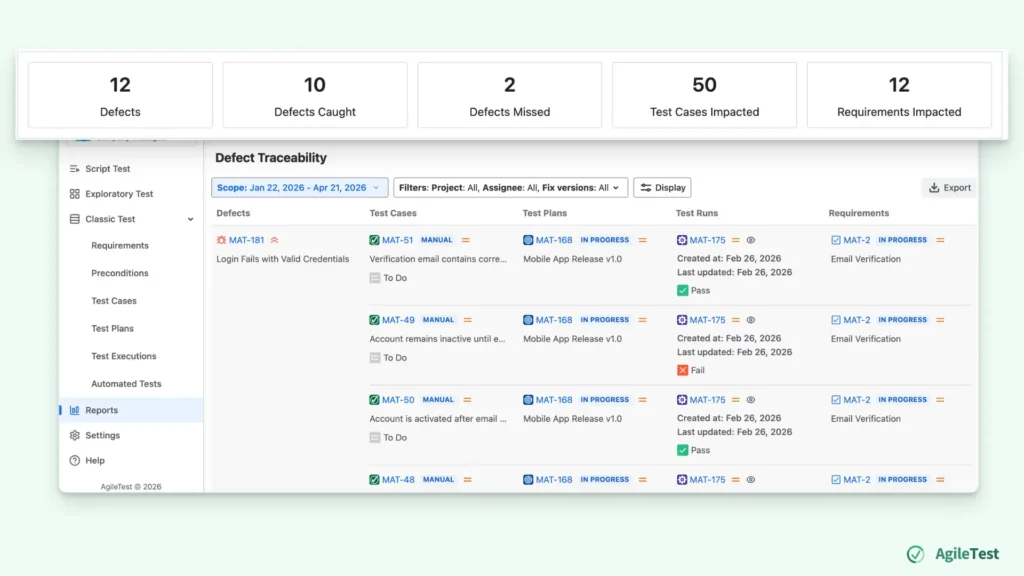
The Defect Summary Report also links each defect to its related test cases and requirements. This enables you to understand which parts of the product are affected by each defect and provides context on how widespread the issue is.
For instance, a defect may impact multiple test cases and several key requirements, making it a higher priority to resolve.
By regularly reviewing the Defect Summary Report, you can make more informed decisions. This ensures that critical issues are addressed promptly, allowing your product to stay stable, high-quality, and release-ready.
Step 4: Review Overall Progress with Project Metrics
At the final stage, you can use the Project Metrics report to capture overall project insights. It consolidates data from various reports and offers a snapshot of overall testing health. This enables teams to quickly assess the status of testing, track trends, and make data-driven release decisions.
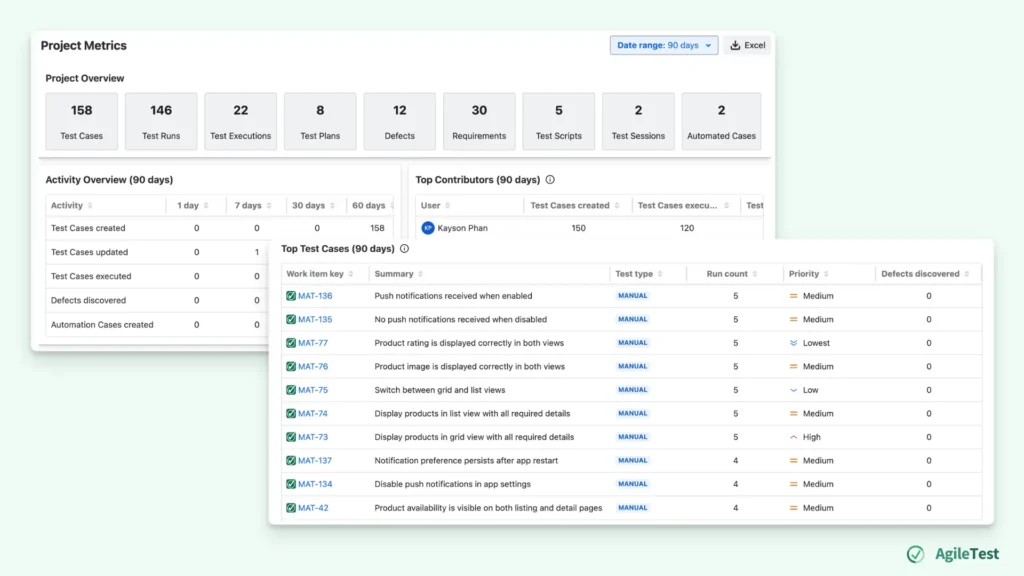
For instance, you can know
- Which member contributes the most to the projects
- Which test cases are the most impactful
- ….
By leveraging both project insights and testing metrics, you can manage your projects and resources more effectively.
Final thoughts
Measure test progress is a continuous, data-driven process that helps Agile teams stay aligned and focused on the right priorities.
By using AgileTest’s built-in reports, you can gain real-time visibility into requirement coverage, test execution, defect resolution, and measure overall test progress. This allows teams to make faster, more informed decisions, prioritize critical tasks, and maintain a high standard of quality.
With these insights, teams can move forward confidently, knowing they have tracked every key aspect of testing—ensuring that only the best product reaches your users.
AgileTest is a Jira Test Management tool that utilizes AI to help you generate test cases effectively. Try it now