If you’ve been part of a software team for any length of time, you’ve likely felt it. It’s that nagging feeling that things could be… better. Maybe your team is constantly fighting last-minute bugs that derail release dates. Perhaps your regression testing suite takes an entire day to run manually, slowing down your feedback loop. Or maybe it’s the simple communication breakdowns that lead to rework and frustration. You’re all working hard, but you feel stuck in a cycle of recurring problems.
This desire for a “better way” is the starting point for one of the most powerful practices a team can adopt: process improvement. It’s not about working longer hours or pushing harder; it’s about fundamentally changing how you work to achieve better outcomes with less friction.
But where do you even begin? The idea of “improving our process” can feel huge and overwhelming. That’s where a structured model comes in. Enter IDEAL, a simple, five-step framework designed to guide you on your improvement journey. Based on the classic Plan-Do-Check-Act (PDCA) cycle, IDEAL provides a roadmap that turns vague aspirations into concrete results.
This article will walk you through the entire IDEAL model, breaking down each phase into practical, actionable steps. Whether you’re part of a large organization or a small Agile team, you’ll learn how to use this framework to diagnose your pain points, implement meaningful changes, and build a culture of continuous improvement.
The Philosophy of Improvement: From Corporate Mandates to Team Tweaks
Before we dive into the model, it’s crucial to understand that process improvement isn’t a one-size-fits-all endeavor. The IDEAL model was originally designed for large-scale, organizational change, but its principles are so universal that they scale down beautifully to a single project or even an individual development team.
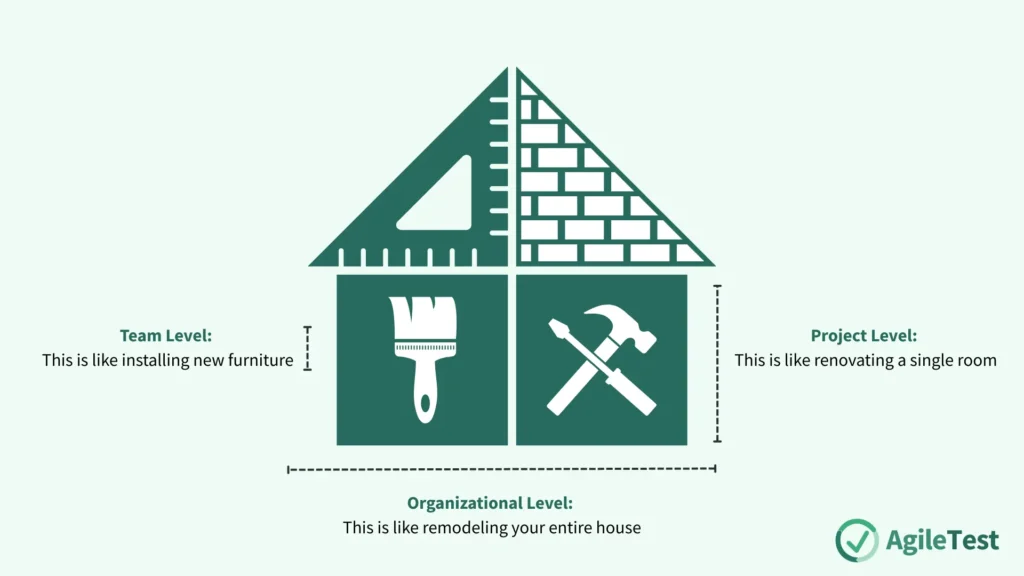
Think of it like home improvement:
- Organizational Level: This is like remodeling your entire house. It’s a massive undertaking involving significant planning, resources, and buy-in from everyone living there. The “Initiating” and “Establishing” phases are formal and extensive.
- Project Level: This is like renovating a single room, such as the kitchen. It’s a more focused effort with a clear scope and objectives tied to that specific project’s success.
- Team Level: This is like installing new, efficient shelves in your garage. It’s a lightweight, targeted improvement that a small team can decide on and implement quickly to solve a specific, immediate problem. A retrospective might serve as the entire “Diagnosing” phase, and the “plan” might just be a few cards on a Trello board.
For most developers and testers, improvement will happen at the team or project level. The key takeaway is that the IDEAL cycle remains the same; only the scale and formality of each step change.
The IDEAL Model: Your 5-Step Guide to Getting Better
IDEAL is an acronym that stands for Initiating, Diagnosing, Establishing, Acting, and Learning. Let’s explore each step in detail.

I – Initiating: Lighting the Spark
Every journey begins with a single step, and in process improvement, that step is deciding to start. The Initiating phase is all about setting the stage and creating a shared understanding of what you want to fix.
The Goal: To get buy-in from the team and stakeholders and to clearly define the problem you want to solve.
What it looks like in practice:
This phase doesn’t need to be a formal, month-long affair. For a development team, it can be as simple as a 30-minute meeting following a particularly painful release. The team gets together and agrees: “The number of critical bugs we’re finding in production is unacceptable and is burning us out. We need to do something about it.”
From there, you define the initial objectives and scope:
- Objective: “Our goal is to reduce the number of critical defects discovered after a release by 50% over the next quarter.”
- Scope: “To start, let’s focus our improvement efforts exclusively on our code review and regression testing processes. We won’t try to change anything else for now.”
This step is crucial because it provides focus. Instead of trying to “boil the ocean” and fix everything at once, you’ve identified a specific, targeted area for improvement.
Read our related guide to set up effective and actionable objective here: Your Project’s North Star: A Practical Guide to Test Objectives
D – Diagnosing: Finding the Pain Points
Once you know what you want to improve, you need to understand the current situation. You can’t prescribe a cure without first diagnosing the illness. This phase is about investigation and data gathering.
The Goal: To assess your current processes and identify the root causes of your problems.
What it looks like in practice:
There are two primary ways to diagnose your process: analytical and model-based.
- Analytical-Based Improvement: This approach is data-driven. You look at the metrics and facts to identify patterns.
- “Let’s pull the data from Jira. How many bugs are classified as ‘regression’ errors? Which modules of our application generate the most defects?”
- “Let’s look at our CI/CD pipeline logs. How often do our automated end-to-end tests fail? What are the most common reasons for failure?”
Utilize AgileTest Custom Dashboard feature to personalize your project with built-in charts and receive real-time metric reports with visualization.
- Model-Based Improvement (or Retrospective-Based): This approach is more qualitative and relies on the team’s collective experience and wisdom. It’s often done through a retrospective meeting.
- Start/Stop/Continue: What should we start doing, stop doing, and continue doing to improve our testing quality?
- The 5 Whys: A bug made it to production. Why? Because it wasn’t caught by a test. Why? Because the test case was outdated. Why? Because we don’t have a process for updating tests when requirements change. And so on, until you find a root cause.
The output of the Diagnosing phase is a list of potential weaknesses and opportunities for improvement. For example, your team might discover: “Our regression test suite is flaky because the test data is inconsistent,” or “Our code reviews are superficial because there’s no checklist to guide them.”
E – Establishing: Crafting the Plan
You have a goal and a list of problems. Now it’s time to create a plan of attack. The Establishing phase is about turning your diagnostic findings into a prioritized, actionable plan.
The Goal: To create a clear, prioritized list of actions that the team will take to achieve the improvement objective.
What it looks like in practice:
Your team has a list of potential improvements. You can’t do them all at once, so you must prioritize. When deciding what to tackle first, consider:
- Return on Investment (ROI): Which change will give us the biggest bang for our buck?
- Risk: Which problems pose the biggest risk to our project if left unfixed?
- Alignment: Which improvements align best with our team’s current goals and strategies?
- Benefits: Which actions will deliver the most tangible and measurable benefits?
Let’s say your team identified two issues: “Our manual smoke test takes an hour,” and “Our test case documentation is disorganized.” You might prioritize automating the smoke test because its ROI is huge—it could save the team five hours every week.
The plan itself can be very lightweight. It could be a dedicated section on your team’s Wiki, a few user stories in your backlog, or a “Process Improvement” column on your Kanban board. The key is that everyone knows what the plan is and what the priorities are.
Refer to our guide to master Test Planning here: Mastering Test Planning: Your Guide from Chaos to Clarity
A – Acting: Making It Happen
This is where the rubber meets the road. The Acting phase is about executing your plan and implementing the changes you’ve decided upon.
The Goal: To successfully implement the process improvements in a controlled and deliberate way.
What it looks like in practice:
This phase typically involves a few stages:
- Implementation: Someone on the team takes ownership of the action item. For our smoke test example, a developer might be tasked with writing the automation scripts.
- Training & Piloting: You don’t want to roll out a major change to everyone at once. First, you pilot it. The developer demos the new automated smoke test to the team (training). For the next sprint, they run it in parallel with the old manual process (piloting). This allows the team to gain confidence in the new process and identify any issues in a low-risk environment.
- Full Deployment: Once the pilot is successful and the team is on board, the new process becomes the official standard. The manual smoke test is officially retired, and the automated test becomes a required check in the deployment pipeline.
Acting is about turning ideas into reality, one small, deliberate step at a time.
AgileTest supports all test environments and strategies — from agile testing to traditional approaches. Try it now.
L – Learning: Closing the Loop
This final phase is arguably the most important and, unfortunately, the most often skipped. The Learning phase is about reflecting on the changes you made and evaluating their impact.
The Goal: To verify if the improvement had the desired effect, learn from the experience, and decide what to do next.
What it looks like in practice:
After the new process has been running for a while, the team gets back together to review the results.
- Verify Benefits: “We set out to save an hour per deployment. Are we? Let’s check the pipeline logs. Yes, the new process takes 5 minutes instead of 60.” (This is a planned benefit). “Interestingly, because the test runs automatically on every commit, we’re now catching integration bugs much earlier than before.” (This is an unexpected benefit).
- Learn What Worked (and What Didn’t): “We learned that using our existing framework for UI automation was fast and effective. However, we also learned that the test reports are hard to read, and we need to improve them in the next iteration.”
This learning is the critical fuel for your next improvement cycle. Based on what you’ve learned, you can go right back to the Initiating phase and start a new loop, perhaps this time focused on improving the clarity of those test reports. This creates a virtuous cycle of continuous, incremental improvement.
Conclusion: The Heart of a High-Performing Team
The journey to building truly great software is a marathon, not a sprint. It’s a process of continuous learning, adaptation, and refinement. The IDEAL model provides the structure for this journey, transforming the abstract desire to “get better” into a tangible, repeatable process.
Don’t be intimidated by the idea of process improvement. You don’t need to change everything overnight. Start small. Pick one recurring frustration that your team faces. Use IDEAL as your guide: Initiate a conversation, Diagnose the root cause, Establish a simple plan, Act on one small change, and Learn from the result.
By embracing this cycle, you empower your team to take ownership of its own processes, solve its own problems, and steadily evolve. This culture of continuous improvement is the true heart of any healthy, happy, and high-performing software team.